|
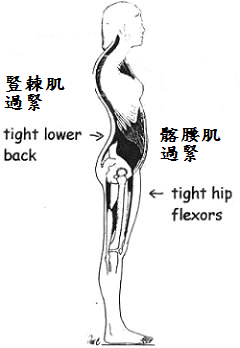
"S-Posture" vs. Low Back Pain Previous issue was about Upper-Cross Syndrome. This month's topic will be about Lower-Cross Syndrome. What are Upper and Lower Cross Syndrome? They are syndromes with various complications that can wreak havoc on the average person. For the athlete, especially the powerlifter, they can decrease strength, flexibility, range of motion and lead to further degenerative processes (wearing down of the body - arthritis, etc.). Upper cross syndrome refers to the upper part of the body, namely the neck / upper back / chest / shoulder areas. Lower cross syndrome refers to the lower part of the body surrounding the pelvis / lower back / abdominal / upper thigh areas. What happens in both syndromes is that several muscle groups have become shorter and tighter. Other muscle groups have become weakened as a result of the previous mentioned tight muscles. What happens then is these problem areas start a bad cycle - they each get worse, making the other worse also. More tight muscles and increased weak muscles. Unless they are halted, they will start to change the composition and integrity of the surrounding joints, muscles, cartilage, nervous structures and other tissues. This means osteoarthritis (aging or degenerative arthritis) can rear its ugly head. This is not good for the powerlifter as the powerlifter needs good joints to withstand the incredible stresses and forces we place on them during our heavy training. Postural changes of the body will also occur with these syndromes.
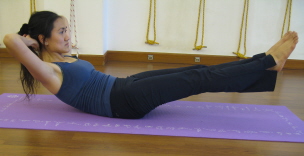
Suggestions: Half Boat Pose (Ardha Navasana) -- to strengthen abdominal muscles group, including rectus abdominis, external oblique, internal oblique and transversus abdominis. In which the transvesus abdominis is the deepest muscle of the abdominal with fibres run horiontally acts like an internal weight belt, to stablize lumbar spine and assisting in normal lordosis maintenance.
1. Sit on the floor
with the legs in front of you. Interlock the fingers behind your head.
2. Lean back and let
your lower back on the floor. As
you exhale, lift your legs off the mat. Keep your knees 3. Keep breathing and hold for at least 30 seconds.
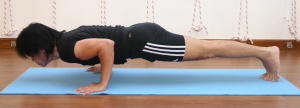
Four Limbs Staff Pose (Chaturanga Dandasana) -- to strengthen abdominal, back and buttock muscles. 1. From Plank position, firm the abdomen and bend the arms straight back, keeping the upper arms hugging into your sides. 2. As you exhale, lower down toward the floor, stopping when your forearms and upper arms are at a right angle. 3. Keep the whole body level with the floor. 4. Push back into the heels. 5. Keep breathing and hold for 5 seconds. 2 times a day. Gradually increase to hold this pose for 45 seconds. 6. Lastly, exhale and lower the body to the floor and rest.
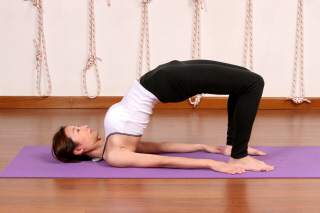
Bridge Pose (Setubandha Sarvangasana) -- to strengthen buttock muscles 1. Lie supine on the floor, arms by the sides of the body. Bend your knees and set your feet on the floor, heels as close to the sitting bones as possible. 2. Exhale and, pressing your inner feet and arms actively into the floor, push your tailbone upward toward the pubis, and lift the buttocks off the floor. Keep your thighs and inner feet parallel. 3. Keep your knees directly over the heels, but push them forward, away from the hips, and lengthen the tailbone toward the backs of the knees. Lift the pubis toward the navel. 4. Firming the shoulder blades against your back, press the top of the sternum toward the chin. Stay on the tops of your shoulders. 5. Stay in the pose anywhere from 30 seconds to 1 minute with normal breathing. Release with an exhalation, rolling the spine slowly down onto the floor.
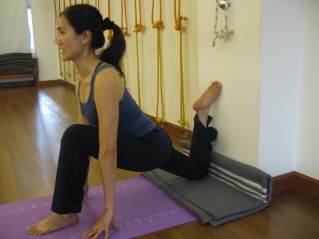
Modified Pigeon Pose (Kapotasana) -- to stretch hip flexors
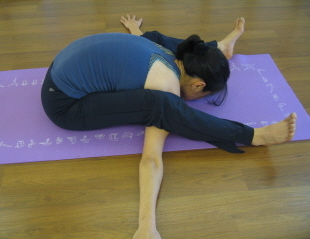
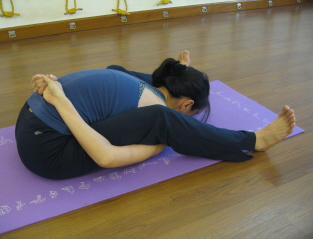
Tortoise Pose (Kurmasana) -- to stretch erector spinae
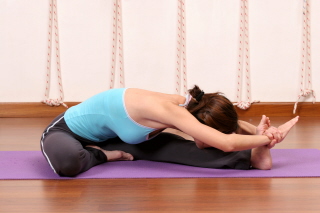
Head to Knee Pose (Janu Sirsasana) -- to stretch back of the thigh
ˇ@ ˇ@ Namaste,
|
||||||
| ˇ@ |
Copyrights © 2024 Yoga Place | ALL RIGHTS RESERVED | Privacy Policy